23 Jan Best Fiber Optic Cabling Installation Practices Guide
Fiber optic cabling installation is a complex process that requires specialized knowledge and equipment. Here are some best practices for fiber optic cabling installation to ensure a successful and reliable installation: 

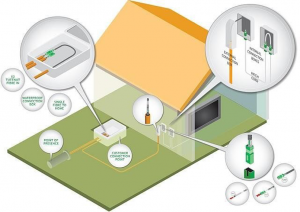
- Plan the Installation: Before starting the installation, it is important to plan the route of the cable and to ensure that the conduit or other pathways are properly prepared to support the cable and the cost of cable installation.
- Handle the Cable Carefully: Fiber optic cables are delicate and can be easily damaged. It is important to handle the cable carefully and to avoid bending, twisting, or crushing the cable.
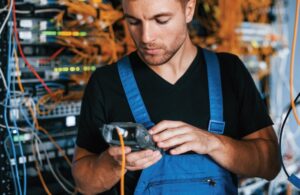
- Use the Right Tools: The installation process requires specialized tools, such as fiber optic cable cutters, strippers, and cleavers. It is important to use the right tools for the job to ensure a clean and precise cut.
- Clean the Connectors: Before connecting the cables, it is important to clean the connectors to remove any dust or debris that could cause signal loss.
- Test the Cable: After the cable has been installed, it is important to test the cable to ensure that it is functioning properly and that there are no breaks or other issues.
- Properly Label and Document: Properly label and document the cable runs, patch panels, and other components, to ensure that the system is easy to understand, troubleshoot and maintain.
- Follow safety guidelines: Fiber optic cables are sensitive to light and heat, wear protective gear and follow safety guidelines to avoid damage to the cable or harm to the installer.
- Training: It is important that the installers are trained and certified on fiber optic cabling installation and handling, this will help to ensure a successful and reliable installation.
How to make a Preparation for Our Fiber Cable Installation (Before we begin)?
Before beginning a fiber optic cabling installation, it is important to properly prepare for the installation to ensure a successful and reliable installation. Here are some steps that can be taken to prepare for a fiber cable installation:
- Plan the Route: Carefully plan the route of the cable and ensure that the conduit or other pathways are properly prepared to support the cable.
- Obtain Permits: Obtain any necessary permits, such as building permits or right-of-way permits, to ensure that the installation is in compliance with local regulations.
- Gather Materials and Tools: Gather all necessary materials, such as conduit, cable, connectors, and tools, such as fiber optic cable cutters, strippers, and cleavers, to ensure that the installation can proceed smoothly.
- Prepare the Work Area: Prepare the work area by clearing away any debris and ensuring that there is adequate lighting and power for the installation.
- Review Safety Procedures: Review safety procedures to ensure that the installation is done safely, and that the cable and the installers are protected from potential hazards.
- Identify any potential problems: Identify any potential problems that could arise during the installation, such as difficult access points or the presence of other utilities.
- Coordinate with other trades: Coordinate with other trades, such as electricians or plumbers, to ensure that the installation does not interfere with other work that is being done.
- Notify the building owner and tenants: Notify the building owner and tenants of the planned installation, to ensure that they are aware of the work that is being done and to minimize disruptions.
How to proceed with Installing Our Fiber Optic Cabling (When work is ready to begin)?
- Plan the installation route: Determine the most efficient and effective route for the fiber optic cable to be installed, taking into account factors such as building layout, potential obstacles, and local regulations.
- Prepare the installation site: Clear the installation route of any potential hazards or obstacles and ensure that the area is accessible.
- Install conduit or ducts: Run conduit or ducts along the planned route to protect the fiber optic cable from damage.
- Pull the fiber optic cable: Carefully pull the fiber optic cable through the conduit or ducts, making sure to avoid putting any tension on the cable.
- Connect the cable: Connect the fiber optic cable to the necessary equipment, such as patch panels and optical network terminals.
- Test the cable: Test the cable to ensure that it is properly connected and functioning.
- Document the installation: Document the installation by keeping a record of the cable route, the equipment used, and any issues that were encountered and resolved.
- Clean up: Clean up the installation site and dispose of any materials that were used in the installation.
Fiber Optic Service Loops
Fiber optic service loops refer to the extra length of fiber optic cable that is installed at the time of initial installation and left unterminated. The purpose of a service loop is to provide a means for maintenance or future expansion of the fiber optic network without the need to disrupt the current service or install new cable.Service loops are typically installed at the ends of the fiber optic cable run, usually in a patch panel or equipment room. The service loops are then coiled and secured in a manner that allows for easy access and deployment, as needed.When a service loop is needed, it can be uncoiled and spliced to the end of the existing fiber optic cable, allowing for the addition of new equipment or the expansion of the network. This is much less disruptive than having to install new cable.It is important to keep in mind that service loops do take up space and may not be suitable for all installations. The amount of service loop to be installed should be determined based on the specific requirements of the project and the expected future growth of the network.